
Radio Controlled Rocket Glider Kits
Information Page: Applies to all kits, each kit has it's own specific build instructions but read this page first.
Items needed for assembly:
Foam safe CA+ with accelerator for most glue joints. I use Bob Smith gold with the black cap or Hot Stuff UFO Foam safe Thick CA, **other CA's may melt the foam, test on scrap if you aren't sure. DO NOT use CA debonder on the foam without testing on scrap.
3M-77 spray adhesive for laminating if needed.
Items needed for rocket flight:
Receiver
1S 500 mah 3.7V lipo battery or similar
Adapter wire to connect battery to the receiver
2 12-18" servo extensions:12" extension 18" extension
2 10-11 gram micro type servos I prefer Hitec HS-65 HB, they are more expensive but are quality servos.
Transmitter with elevon/delta mixing capability (Spektrum DX-6e or similar) (optionally with ability to put glide up-trim setting on a switch)
Finishing Materials:
I have personally used model master and testors enamel small rattle can flat black, flat red, olive drab, and gray on depron foam. If you are masking over painted foam, the tape may pull up the paint so you can't use a masking tape that is too sticky, I use blue masking tape but it isn't perfect, so I try to avoid color schemes that require masking painted foam. You need to be careful not to spray too close to the foam or the spray solvents can melt the foam. Use many light coats, not one heavy one. I don't recommend any other brand of paint, and it's always good to test on spare foam first. There are methods to use thinned water based polyeurethane to coat the foam first, but I haven't done that and I like to keep my models as light as possible. One customer tested Rustoleum direct to plastic paint on some scrap and it seemed to be ok, but then it damaged the top surface of the wing, an online search showed that you needed to keep at least 2' away when spraying and it was not specifically listed as ok for foam in any case, so again, I'd stick with the model master/testors enamels.
www.stickershock23.com is my go-to person for cut vinyl, he has excellent turnaround time, does great work based on just an idea, and his prices are very reasonable. The vinyl is lightweight and easy to work with.
**Notes when applying stickershock vinyl decals.
Stickershock decals are supplied with a stiff backing sheet and a sticky thinner facing sheet. You should trim as closely around the markings as possible, then remove them from the stiff backing sheet. Be careful with small markings to be sure they come with the facing sheet and aren't left stuck on the backing. They will now have the sticky backside exposed. Apply the decal to the area desired. THIS IS IMPORTANT...when removing the facing paper, especially on painted surfaces, you want to roll the facing paper off carefully while pressing down with your fingers/thumb to make sure it does not pull up paint or the marking. You don't want to just pull the sheet off like a sticker. On smaller markings or on thin stripes, it might be easier to remove the marking from the backing/facing sheet and apply it straight to the model to avoid pulling up any paint. Once the markings are applied, apply heat from a hair dryer, and press down the markings once you see them soften, you should see them start to show the foam grain underneath, they should stay well attached at that point. Be careful if you try to use a heat gun not to warp or melt the foam.
Rocket motors:
It's recommened using the aerotech 24mm E-6 motor for first flights since it gives the slowest boost and allows time to trim the model if needed. They are easy to use, just grease the inside of the case, o-ring, and forward end of the propellent and outside of the liner(I use synthetic SuperLube) , insert propellent, insert nozzle, insert o-ring, screw shut. Retail Cost per flight for the reloads is as good or better than Estes Black powder E motors and they have approx 40% more total impulse. I use a baby/handy wipe and paper towel to clean inside the case every three flights or so or after I'm done flying. Here's a video showing how to reload the 24mm aerotech motor.
See theOrdering Page for ordering.
These models were designed and engineered for very light weight and slow glide, with a moderate boost speed of approx 88fps. The use of higher thrust motors, while entertaining, may exceed the structural limits they were designed for. In addition, the higher thrust motors give less time and margin for steering on the way up to account for any trim, cg or wind issues you may have.
Notes on radio equipment and flight battery(many radios will work, this is what I use and know will work)
Transmitter: I use a DX8gen2 radio, but the new DX6 has most of the same features, 250 model memory, mixing, flap switch for glide trim...pretty inexpensive. These models require mixing of the aileron/elevator channels to provide control. Simple 2-5 channel radios usually do not provide this feature. It may be possible to purchase an electronic mixing module to add to the model. You also need to be able to put in trim for glide, you can do this manually with the trim tab but you will need to set and re-set this each flight. The 6 channel radios and higher usually include both the mixing feature and the ability to program up trim on the flap switch which allows easy setting/resetting of the trim position on a switch.
Receivers. I fly spektrum and use the full range micro AR400 receiver.
Most receivers can run with 3.5V or better input so a larger capacity 1S battery(500mah) should work fine. Servos will run a tad slower. The 1S batttery will need a plug or adapter that is compatible with your RX. If you need more nose weight for balance and you don't want to add lead, you can just use a larger flight battery instead.
I use a hitec x1 charger which is overkill for a 1s battery but I use it for charging my transmitter and 3s batteries as well X1 Charger
This is a nice tiny charger that uses a usb connection: USB Charger You Just need something with a jst connector, will charge a 1s battery and have a charge rate about 500ma or so. I fly a single battery and am doing 10-12 flights on one battery with only about 150mah out of 500 being used...
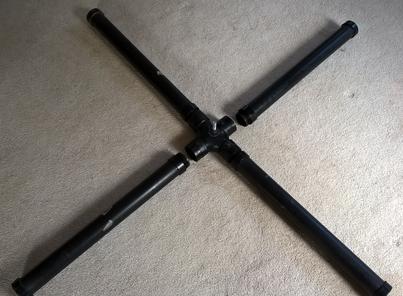
Launch Pad: For flying at my local RC field I made a very simple pad. Since I boost straight up and then can steer into the wind if needed I didn't need any angle adjustment. I simply used 2" sch. 40 black abs pipe available from the local home depot, with legs about 2' long with end caps on one end and put some threaded ends on the other. I bought a "+" shaped intersection and put threaded couplers into each inlet of the intersection. That way I can screw the legs in or take them out for transport. To mount the rail I bought a 8" by 1/2" bolt. I drilled through the intersection in the middle for the bolt to pass all the way through and secured it with a nut and washers. I used two hose clamps to clamp the rail to the bolt in two places. The bolt naturally tends nest in the rail slot and keep it straight. Originally I cut a 12" long piece of black abs pipe and slide that over the rail and it stops on the hose clamps and acts as a standoff to keep the model up off the ground. Now I just put another 1" hose clamp on the rail and snugged it up tight, the model will stop against the screw portion of the hose clamp. You can add a blast deflector if you think you need it, the E-6 motors don't make a lot of flame so I don't use one, I keep the model about 12" from the base when I launch.
Notes on Flying
It is recommended you use a 6' rail to launch your model to avoid any flex/whip which can happen with a rod. If you do use a rod, make sure it is at least a 6' 1/4" rod to give sufficient airspeed on launch, you'll need to add a 1/4" launch lug to the model centered on the CG location at least 5" long. The rail buttons are designed to be used with standard 1010 rail that can be purchased online and from the 80/20 corporation on ebay/amazon.
*While these models are very easy to fly and boost, they are not intended for a novice flyer. Initial flights may require minor trimming to be done both for boost and for glide. It is best to use one of the low thrust long burn motors for these initial trim flights to give time to react to any trim adjustments needed. It is best to have an experienced R/C pilot do the initial flights/trim and fly with a buddy box with you for subsequent flights until you are comfortable. Even though they boost with little to no input once trimmed, do not assume that you can leave your radio off and/or not touch the controls. It is hard to judge winds aloft and you must be ready to keep the model boosting straight if needed.
Turn on your transmitter and then receiver. Install a loaded motor. Ensure your balance is still correct and all control surfaces are in the correct position for boost and are moving the right direction.
Check your glide trim setting is correct if you have that on a switch, but make sure you switch to boost setting for launch!
Be sure to use a standoff with at least 12” from the blast deflector or pad to avoid any hot particles from bouncing back and melting the foam.
Do not put the standoff directly below the nozzle for the same reason.
Once the model boosts, react quickly in either pitch or roll to keep the model pointed straight up or slightly away from you so you can see it. As the model reaches apogee, push the model over to level flight to keep flight speed and then switch in the trim setting. If you let the model get away from you it can get very small quickly and be very hard to determine orientation. Sometimes it helps to turn yourself in the direction of the flight of the model to avoid getting confused. For the first flight you may have some roll or pitch trim that needs to be set for boost and/or glide depending on how straight you built your model. Adjust as needed.
Once gliding, circle your landing spot while not banking too sharply which causes the model to lose altitude. Do not let the model get too slow till you have a feel for how it flies. Set up for landing into the wind. If you find you are slightly high, it is better to make gradual S turns back and forth keeping the model pointed into the wind slightly to lose altitude and avoid a downwind turn. When about 20 feet off the ground start to level the model and let it settle, if it gets too slow, push the nose forward slightly. About two feet off the ground pull back slightly to flare and soften the landing. If you have a model with fully movable surfaces it is a good idea when landing on grass to relax the up elevator just before touchdown to prevent the tips of the controls from catching on the grass/dirt and damaging them. It may take some time to judge your landing spot so fly in an large open space till you are confident in your landings. If you keep the model overhead you can always adjust your altitude with S turns. If you let the model get very far away it can be hard to judge orientation. If there is a headwind, launch up wind and make sure not to go too far downwind or you won't be able to make it back to the launch site.
Be sure to check the controls, battery attachment, wires, launch lug or buttons before each new flight to be sure nothing loosened.
If you have any slight damage you can use the spare depron to repair it. Simply cut the damaged piece out, cut a new piece, insert and glue in place. You can use the blenderm tape to give extra strength if needed. If the depron gets cracked, and it is a clean break, you can re-glue and tape as well.
Can I learn to fly RC using a rocket glider? Short answer is not really, unfortunately. Even though these are relatively easy to fly, they don't have an on off switch and you need to do some trimming during the first few flights. It is nearly impossible for a new flyer to keep his left/right straight while trying to trim a model going 60 mph straight up in a few seconds. There are a few micro rocket gliders available that can boost hands off and have only yaw/pitch control, but flight times are very short and it's hard to gain the skills you need in that short of a time. If you have an rc club near you, you could have someone experienced do the first few flights for you to get it trimmed, but you still should fly with assistance/a buddy cord till you are confident. There is simply no point in destroying a nice model learning how to fly. If you have no help or clubs nearby I recommend the eflite radian or radian umx. The latter is a smaller lighter/cheaper version, it can't be flown in much wind though due to the light weight. These are good models to learn to fly with and when you have confidence in your abilities, you can move to rocket gliders. If you get the spektrum radio suggested in my information page it will be usable for these models and rocket gliders.
When flying, practice chopping the throttle and doing deadstick landings, judging your decent rate and airspeed beause that's what you will have to do when flying the rocket gliders. You should still have someone experienced help you set up and do the first trim flights if you aren't comforable. Simulators are also a good way to get experience. I've found that it really helps when people are trying to learn. When I was doing instructing, people that would come back for lessons each week that were doing simulator practice often had improved their flying skills, while others had to re-gain a bit each time they came back. One thing I feel though, is that simulators, as good as they are, aren't great at helping landings, since it is very difficult on a simulator to judge distance and perspective/altitude, but they are great tools.
Copyright © dynasoarrocketry.com. All rights reserved.
