Radio Controlled Rocket Glider Kits

Shuttle Plans:
Here is a plan for your personal use. Click on the link for a pdf download of the parts tracings. You can use the other link below to see the build thread on rcgroups that may help show how it goes together.
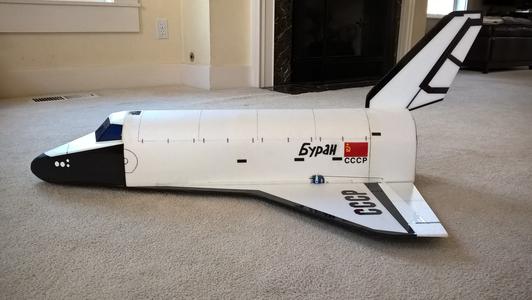
I use a slightly tail heavy launch condition and slightly nose heavy glide and it works without having to shift balast. I prefer a launch rail with guide buttons as there is no flex, if you use a launch rod, you would need a minimum 6' 1/4" rod to give proper liftoff speed. The plan is a simplified generic shuttle design that you can modify and add details to make a US or russian shuttle. I leave the nose/cockpit up to the builder to carve from solid blocks or stacked and glued pieces as desired. Below are pictures of 3 different versions made from the same basic plans, along with some flight video. Mine came in at about 14 oz rtf and has flown on Aerotech E-12-RC, E-6RC, and E-15PW rocket motors.
Reminder that this was scanned full size, but printers normally cannot print to the edges, and they will shrink the image and put some border around it, this will yield a smaller than original print and may cause mis-alignment, make sure you turn off page scaling in the printer before printing, and that there is no scaling or auto-expand or fill to the sheets and that you print without borders.
When cutting slots and tabs, it is better to cut one side, then overlay it on the otherside and mark the tabs and slots, that way you are sure they line up perfectly. The plans are tracings of my parts but fitting may be required.
Build light, I've included carbon where it is needed for flight loads. I use velcro to hold the RX and bec/esc in place, as it allows easy changing out if needed.I don't use clevis connectors, but use .039 music wire and Z bends that fit tightly and glue my servos in place. Less to fail or go wrong. there is zero slop and it is light and simple. If you have to splice your foam sheets, use blenderm tape on both sides to reinforce the joint if needed. I use great planes or dubro wing skids on the bottom of the fuse and this helps avoid landing damage. Please feel free to send me feedback on any issues or success you have. Note this was designed to use 6mm/3mm depron sheet which has the perfect combination of stiffness and light weight. This may mean you need to adjust slots for a different thickness or add more carbon to provide the right stiffness if you use a different type/thickness of foam.
My boost CG with loaded motor in place is 14" forward from the TE of the elevon at the inboard edge closest to the fuse.


