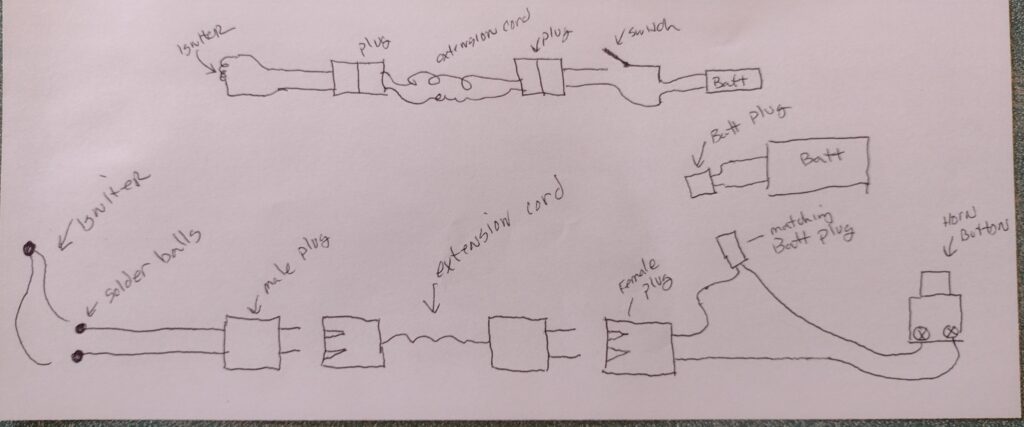
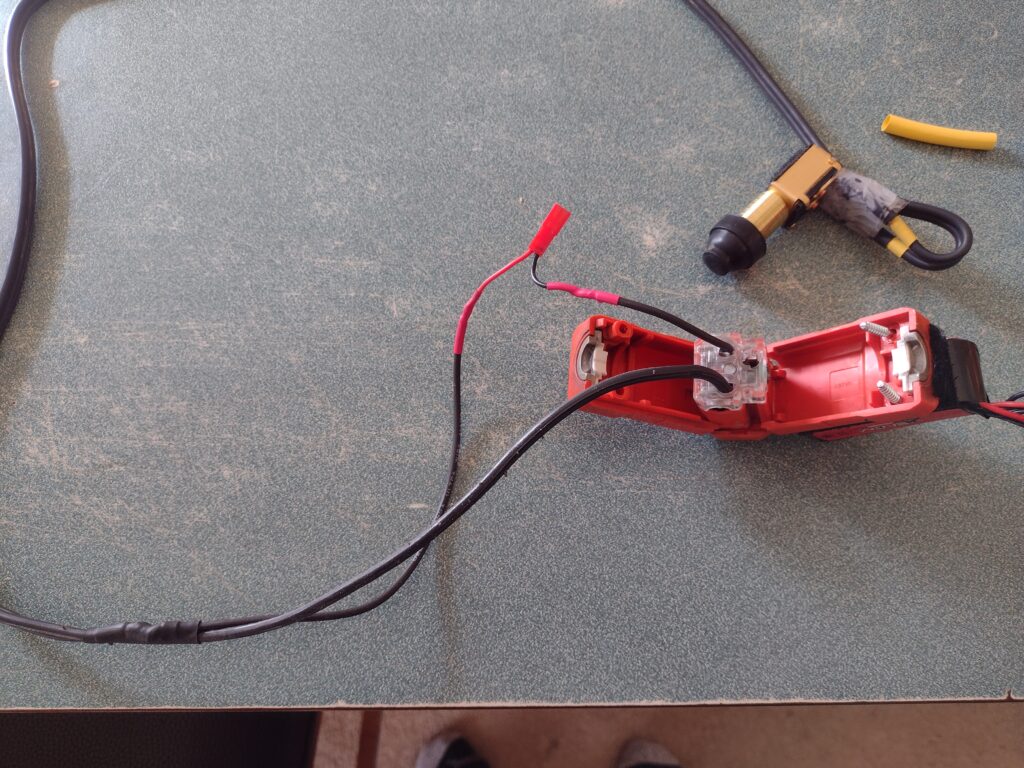
For launching by myself I made my own launch controller. NAR rules specify that for E power you must be at least 50′ away from the model and must have an electrically powered controller with a temporary on launch switch, and an arming switch or safe plug. I bought some heavy electrical cord from Home depot 6′ long, then got a heavy duty brass push button automotive starter button with cap from NAPA auto parts, and a male/female 3 prong plug/socket set. I used 3′ of the cord and wired that to one of the plugs, and put big solder balls on the end of the wires, the solder does not corrode and I just wrap the igniter leads around the ball. Alligator clips get dirty fast, if the solder balls/wire breaks, just re-do more solder balls. The other piece of wire goes to the battery and starter button and socket. I like the particular starter button I chose because it has a box attached that I could mount velcro to and put some velcro on the side of the transmitter near my left thumb. That way I can attach the button to the side of the transmitter and hit the button while still holding the transmitter for flying. I mounted the battery connection at the end of the remaining 3′ cord next to the socket, and velcrod the battery to the plug. The other end has the horn button so that when I’m holding the transmitter I’m not having to hold on to the battery weight, it can sit on the ground. I also doubled over the wires coming out of the horn button and made a loop and taped so that it acts as a strain relief if you were to yank on the transmitter so it isn’t pulling directly on the screw connections the wires go to. Velcro-ing the battery to the socket/plug means if someone trips over the wire it won’t yank the battery wires. For the actual electrical wire going to the pad you can use any length of extension cord or put in several in series. One end plugs to the horn button/battery wires and the other end to the 3′ piece with the solder balls. When I hook up my igniters, I simply wrap the igniter several times around the wires to the rear of the solder ball, it gives something for the igniter to pull against and ensures contact with the wire even when pulled on slightly. I used a 3s800 mah lipo battery since I had a lot of them, it could be larger for power. This puts out enough power that even when it is in storage mode(80% charged) it still puts out enough power to light aerotech igniters so you don’t really need to charge it much at all. Maybe once or twice a year to storage capacity only not even a full charge and I fly a LOT!. For arming/disarming between launches or when hooking up an igniter unplug the battery or extension cord.
Components used:
Starter button https://www.napaonline.com/en/p/NW_786105
3 prong recepticle https://www.homedepot.com/p/Leviton-15-Amp-125-Volt-3-Wire-Connector-Orange-R51-515CV-0OR/205165516